


Open any shared Revit model and you’ll see it.
Materials named Concrete (2), Concrete (3), Default Material. Dozens of duplicates with half-broken textures and missing data. It’s more than messy, it’s expensive.
Material chaos creeps in slowly. One small shortcut here, a quick copy there, and before long, your entire library feels untrustworthy. The good news is that cleaning it up doesn’t require a total rebuild. It just takes a better process.
The slow creep of chaos: How good intentions create bad libraries
Material chaos rarely starts with bad intentions. It begins with the reality of tight deadlines.
A designer duplicates a material to make a quick change; another team member imports content from an older project, and a third downloads a family from a manufacturer’s site. Each choice feels efficient in the moment, but chaos happens when content is created faster than it is managed. Over time, the library becomes a patchwork of inconsistent finishes and half-connected image files.
This is how many interiors teams lose trust in their own Revit libraries. Interior designers work visually, and Revit’s technical structure does not always fit the rhythm of creative design. But materials are the foundation of your visual language. When they are out of control, the presentation loses credibility, and your intent gets lost in translation. One day, you open a file from last year and realize the beautiful walnut veneer you specified now looks like gray laminate because the render path broke when the model changed hands.
The goal is not perfection. It is consistency. Once your team understands where chaos begins, you can start building habits that prevent it from happening again. Here’s how:
Start by managing your sources
Most material chaos starts with a single, simple mistake: duplicating a material without also duplicating its appearance asset. It feels like an easy shortcut, but when two materials share the same underlying data, changing one inadvertently changes them both. Over time, that small error can throw off entire finish palettes across your model.
Here’s how to get it right every time:
-
The Mistake: Right-clicking a material and choosing "Duplicate" without also duplicating the asset.
-
The Result: The new material is still linked to the original’s appearance data. Editing the color or texture of one will change both, and any other material sharing that asset.
-
The Solution: Always right-click and choose "Duplicate Material and Assets." This creates a truly independent finish, ensuring your edits are contained and predictable. In shared projects, this small habit is crucial for preventing unexpected changes.
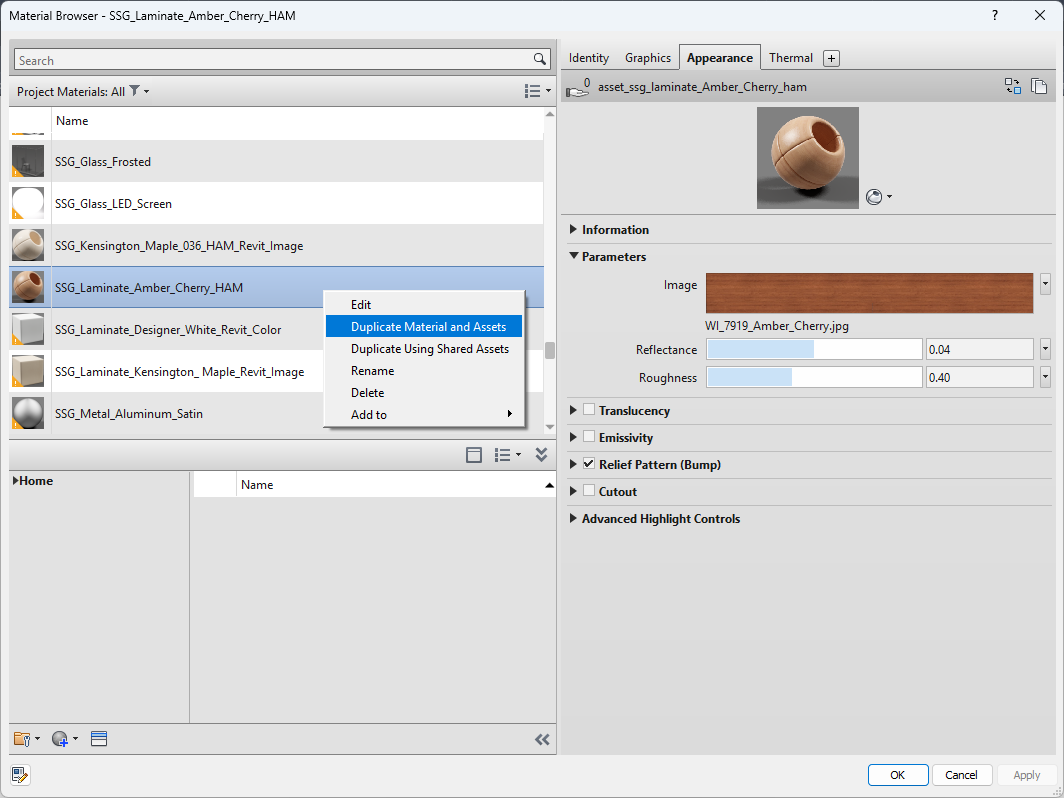
How to properly duplicate a material and assets
Upgrade legacy materials
If you see a warning symbol in the corner of a material thumbnail, you are using a non-PBR material. These older materials do not respond to light correctly, which makes everything look flat and lifeless.
Switch to PBR (Physically Based Rendering) materials. PBR surfaces reflect light in realistic ways, allowing your tile, wood, and metal to look as they do in real life. For interior designers, PBR materials are the difference between a generic render and a believable visualization. When your materials respond to light accurately, your design intent becomes clear without explanation. Using PBR materials in Revit also saves you a crucial step when transferring your model to real-time visualization tools like Enscape, Twinmotion, or D5, as these engines recognize and utilize the PBR maps, eliminating the need to manually re-map materials.
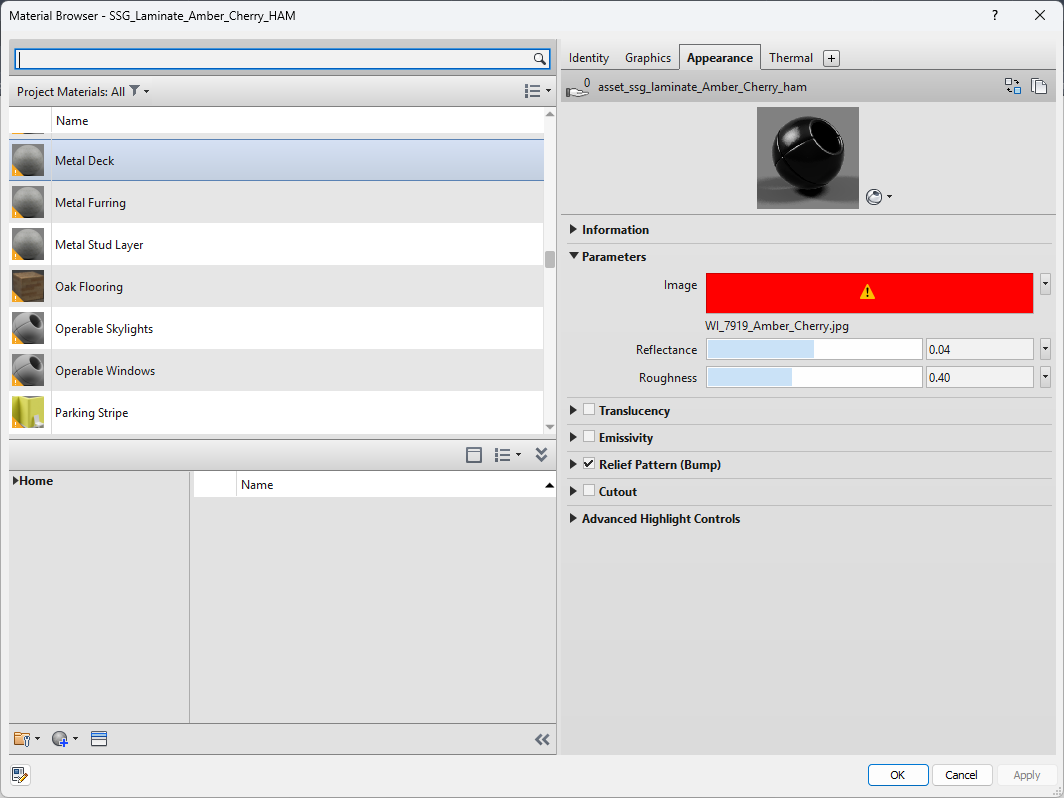
A material browser showing legacy materials with the warning symbol
Centralize your render paths
Another major cause of chaos is missing textures. This happens when image files are stored in multiple folders across different computers. When another designer opens the model, Revit cannot find those files, and materials display as empty or incorrect.
Avoid this by creating one shared render appearance path that every team member uses. To set this up, first create a centralized folder on a shared network drive for all your custom textures. Then, add that location to Revit's search paths:
-
Go to File > Options.
-
Select the Rendering tab.
-
Under the Additional Render Appearance Paths section, click the green plus sign (+) to add a new path.
-
Click the “...” button to browse to and select your shared folder.
-
Click OK to confirm.
When everyone works from the same organized folder structure, materials stay intact no matter where the project is opened. Keep file names simple and make sure everyone on the team has added the shared path.
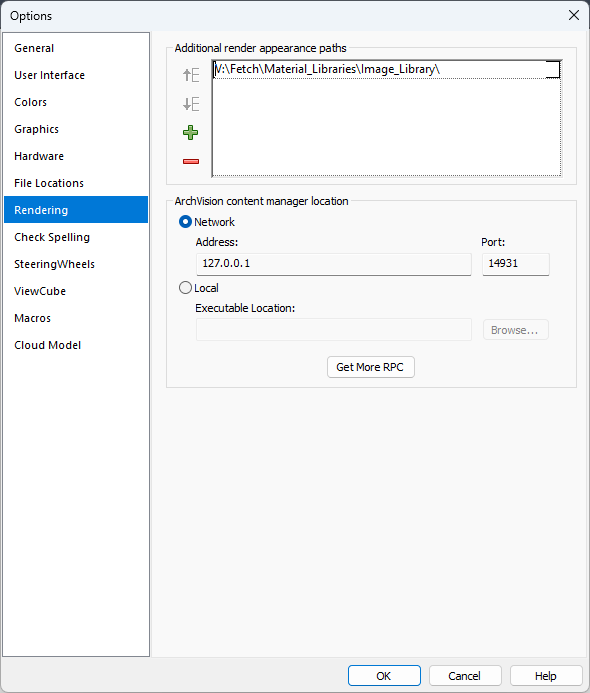
Adding a centralized render appearance path
Build a sustainable material library
Fixing chaos is one thing. Preventing it is another. Once your materials are clean and organized, treat that library as a shared standard, not a personal folder. Establishing a centralized library is key, and there are two primary methods in Revit to achieve this.
Method 1: The Revit Project Container (.rvt)
This approach uses a dedicated Revit project file as a "container" to store and share your standard materials.
-
How it Works: Create a blank project file and place simple objects, like small walls, floor slabs, or a dedicated family. Apply one perfected material to each object. To use a material, a team member opens the container file, selects the object with the desired material, and copy-pastes it into their working project.
-
Key Advantage: This is the most comprehensive method. It reliably transfers all material properties, including Identity data, Appearance assets, and—most importantly—the Graphics fill patterns used for hatching in elevations and sections.
-
Considerations: This method requires careful file management. Only one user can edit the central file at a time, so you need a clear protocol for who can make updates to prevent versioning conflicts or accidental changes.
Method 2: The Autodesk Material Library (.adsklib)
This method uses Revit’s built-in library system, which integrates directly into the Material Browser.
-
How it Works: From the Material Browser, you can create a new .adsklib file and then drag-and-drop materials from your project into it. This file can then be shared and loaded by other users.
-
Key Advantage: The .adsklib file is a lightweight, portable library that feels native to the Revit interface. It is an excellent solution for teams whose primary focus is on rendering and visualization.
-
Key Limitation: This method does not save or transfer the fill patterns from the material's Graphics tab. If your team relies on consistent hatching in construction documents, this can create significant rework, as patterns must be reassigned manually.
Regardless of the method you choose, maintain the library's integrity. Start with clear naming conventions that describe material type, finish, and tone (e.g., “Floor_Wood_OakNatural”). Keep previews updated with consistent lighting so materials appear true to their real color. Schedule regular check-ins to remove duplicates and test for broken paths.
Material libraries inside the Revit material browser
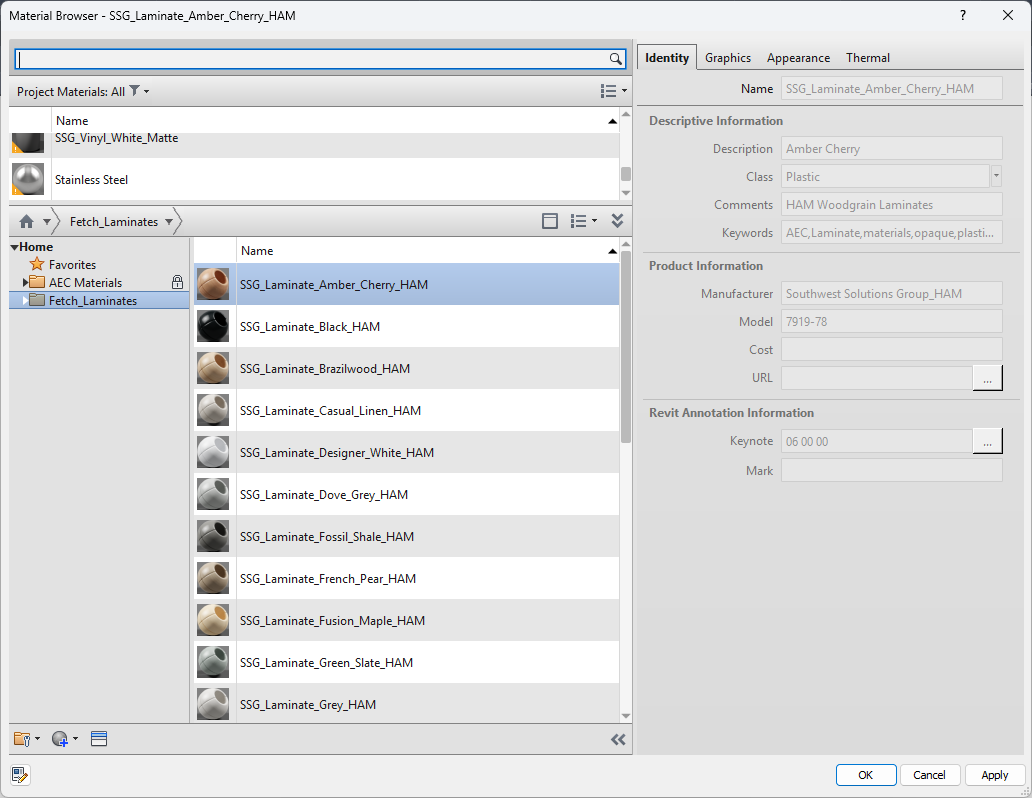
Use metadata to your advantage
Metadata may sound technical, but for interiors work, it is the link between creativity and documentation. Every material in Revit has an 'Identity' tab. Filling it out is not just busywork; it's how you embed crucial information directly into your model. Key fields to complete include:
-
Name: Use a clear, consistent naming convention (e.g., Finish-Wall_Paint_Eggshell_SW7005).
-
Description: Add details like color name, finish type, and intended use.
-
Class: Categorize the material (e.g., "Flooring," "Wall Covering," "Metal").
-
Manufacturer / Model: Specify the exact product for accurate scheduling.
-
Keynote / Mark: Assign a code that can be used for tagging and specifications.
-
Keywords: Add searchable terms like "acoustic," "durable," "recycled content," or "quick ship."
When this data is complete, you unlock powerful capabilities:
-
Effortless Searching and Filtering: Instead of hunting visually, you can instantly find every material from a specific manufacturer, filter for all "acoustic" ceiling tiles, or isolate every "brass" finish in the project.
-
Automated Schedules and Material Takeoffs: This data directly populates Revit schedules. You can generate a complete finish schedule with manufacturer, model, and color information automatically, or perform a material takeoff to quantify square footage for cost estimates.
-
Intelligent Tagging and Annotation: Material tags on your drawings can be configured to pull information directly from the metadata. If you update the material, every tag associated with it updates automatically, ensuring consistency and reducing errors.
This keeps product information close to the design, not buried in emails or PDFs. Metadata transforms your library from a visual reference into a powerful, queryable design database.
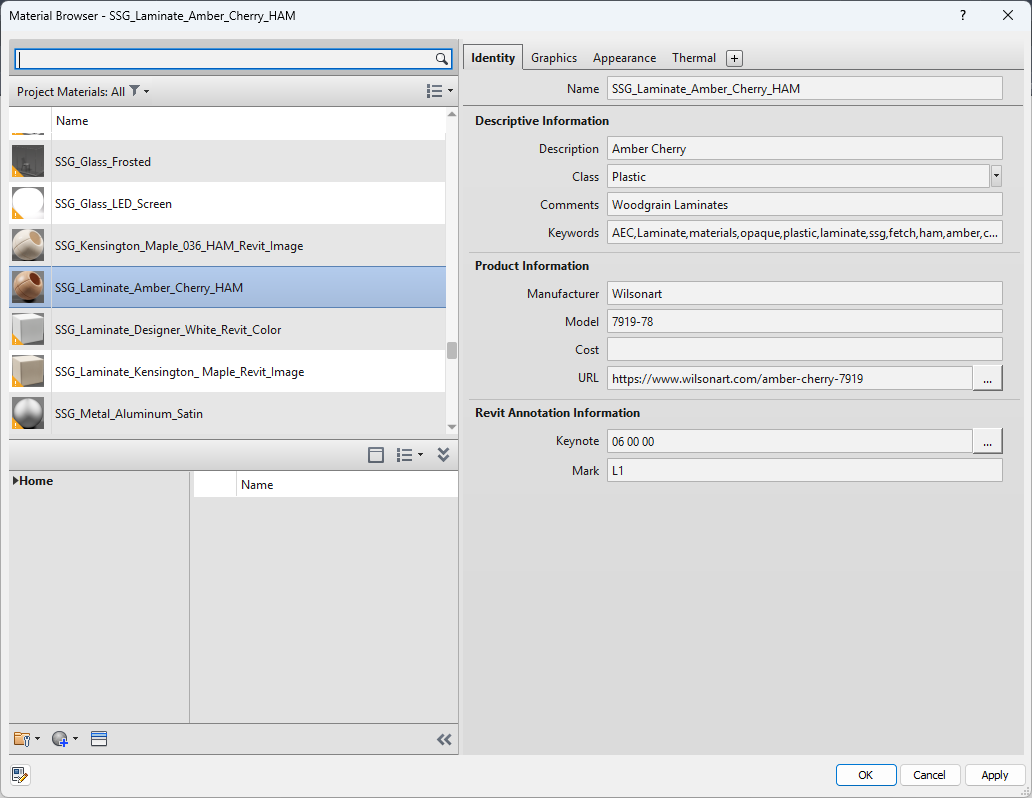
A material with the proper metadata
Workflow example: From chaos to clarity
A design team realized their Revit models were loading slowly and rendering inconsistently. Their material library was full of near-duplicates, broken textures, and outdated finishes that no longer matched their design intent. After a short cleanup and a few process changes, their workflow finally stabilized.
What they did:
-
Recognize it: slow project loads, inconsistent renderings, and duplicate materials.
-
Problems: poor visuals, bloated files, and constant coordination issues.
-
Fix it: First, they used the Purge Unused command (found under the Manage tab) to instantly remove all materials not currently applied to an object in the model. This single step significantly reduced file bloat. From there, they removed the remaining duplicates, switched to PBR materials, created one shared texture path, and applied clear naming standards.
-
Prevent it: maintain a controlled library, review new material requests, provide quick internal training, and run periodic audits.

How to purge unused materials and material assets
Design once and use forever
Material chaos happens when content grows without management. Once you build structure into your library, Revit becomes a reliable design and presentation tool instead of a maintenance task.
The Fetch Material Library was built for this purpose. It gives you high-quality, PBR-based materials with consistent data and appearance assets already in place. Every material is created for real-world accuracy and tested for reliability inside Revit.
Clean materials make better presentations. When your library is organized, your visuals are stronger, and your design intent is always clear.
Explore the Fetch Material Library and start designing with accurate, high-quality finishes that stay consistent across every view.